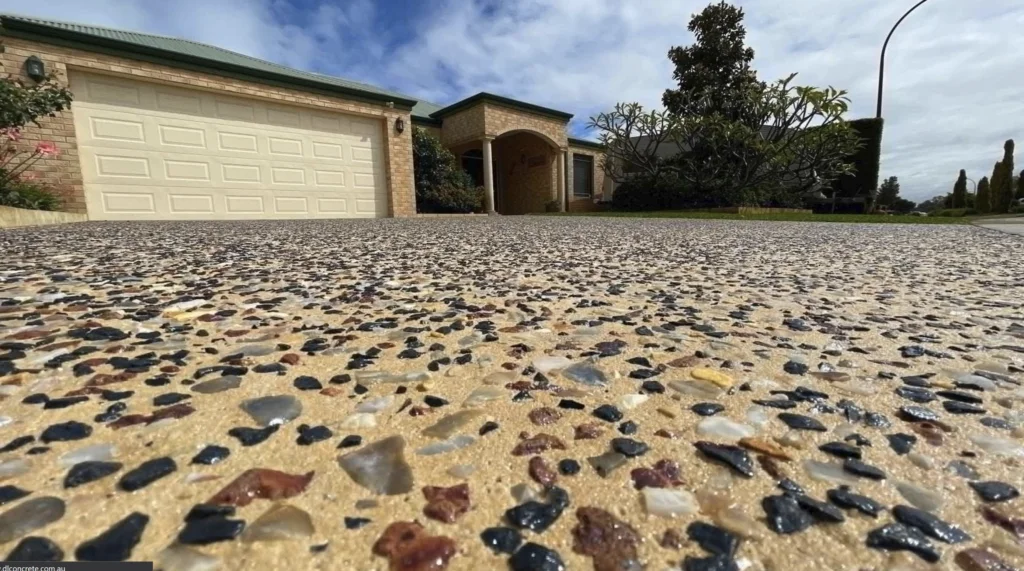
Exposed aggregate concrete is an excellent choice for both residential and commercial projects, such as driveways and outdoor areas like patios and alfresco spaces. Known for its durability, versatility, and aesthetic appeal, exposed aggregate provides a unique and stylish surface that can complement any design. In this guide, we’ll walk you through the steps to install exposed aggregate concrete and provide useful tips to ensure the process goes smoothly.
What is Exposed Aggregate Concrete?
Exposed aggregate concrete is a type of decorative concrete that reveals the natural stones, pebbles, or other aggregates embedded in the surface. After the concrete is poured and begins to set, the top layer of cement paste is removed, exposing the aggregate for a textured, visually appealing finish.
Benefits of Exposed Aggregate Concrete
- Cost-Effective: It requires minimal maintenance compared to other surfaces. Sealing the surface every 3-5 years helps maintain its appearance and durability.
- Durable: It can handle heavy traffic, making it perfect for driveways and outdoor spaces, and withstands harsh weather conditions.
- Customizable: You have control over the choice of aggregates, colors, and layout, allowing you to create a unique design.
- Good Traction: The textured surface offers better traction compared to smooth concrete, reducing the risk of slips, especially when wet.
- Eco-Friendly: Exposed aggregate often includes recycled materials, reducing waste.

Tools and Materials Needed
Safety Equipment:
- Rubber boots and gloves for handling concrete
- Eye protection from chemicals and particles
- A respirator or mask for dust and fumes
Tools:
- Screed board
- Bull float
- Wheelbarrow
- Concrete mixer
- Groover (for contraction joints)
- Power saw (for cutting)
- Pressure washer
Materials:
- Cement powder
- Water
- Aggregate (stones, pebbles, etc.)
- Sand
- Concrete sealer
Step-by-Step Installation of Exposed Aggregate Concrete

1. Site Preparation
Before you begin, ensure the site is properly prepared:
- Flatten and dampen the soil where the concrete will be poured.
- Compact the soil to make it firm.
- Add a layer of gravel to allow for proper drainage.
- Set up formwork to contain the concrete.
2. Mixing the Concrete
To create the mix for exposed aggregate concrete, use the following proportions:
- 15% cement powder
- 15% water
- 70% aggregate and sand (30% sand, 70% aggregate)
Mix these ingredients thoroughly until you have a uniform distribution of the aggregate. The mixture should be pourable but not too runny.
3. Pouring and Leveling
Pour the concrete into the prepared area using a wheelbarrow or cement truck. Use a screed board to level the surface, followed by a bull float to smooth out any imperfections. Be sure to avoid overworking the concrete.
4. Adding and Exposing the Aggregate
After leveling the concrete, additional aggregate can be broadcast onto the surface. Lightly press the stones into the wet concrete using a trowel. Once the concrete has partially set (usually within 6-12 hours), you can begin exposing the aggregate by washing away the top layer of cement.
Exposure Methods:
- Washing and Brushing: Spray the surface with water and use a stiff-bristled brush to reveal the aggregate.
- Surface Retarders: Apply a chemical retarder to delay the setting of the surface, allowing you to remove the top layer after a few hours.
5. Curing the Concrete
Curing is an essential step for the strength and longevity of your exposed aggregate surface. Keep the surface moist by spraying it with water periodically. You can also cover the area with plastic sheets or curing blankets to help retain moisture. Ensure the surface maintains a steady temperature during the curing process.
6. Sealing the Surface
Once the concrete has cured (typically 7-10 days), apply a high-quality sealer to protect the exposed aggregate from weather damage, stains, and wear. Sealing also enhances the color and texture of the aggregate, giving it a polished finish.
Maintenance Tips for Exposed Aggregate Concrete
- Regular Cleaning: Sweep or hose down the surface to remove dirt and debris. Use a pressure washer with a degreaser for stubborn stains.
- Sealing: Reapply sealer every few years to maintain the surface’s appearance and protection.
- Repairing Cracks: If cracks develop, patch them promptly with a concrete filler to prevent further damage.
Common Problems and Solutions
- Uneven Exposure: This can occur if the concrete isn’t washed off evenly. To fix this, consider using an acid wash or sandblasting before sealing.
- Screed Lines: Often caused by improper screeding, these lines can be removed with an acid wash or by smoothing the surface during the initial installation.
- Cracking: Prevent cracks by ensuring proper site preparation, using the right mix ratios, and curing the concrete under the right conditions.
Conclusion
Installing exposed aggregate concrete can be a rewarding project that enhances the beauty and functionality of your outdoor spaces. By following the steps outlined above and using the right tools and techniques, you can achieve a long-lasting, attractive surface that will be the envy of your neighborhood. If you prefer professional assistance, consider hiring experienced concrete installers to ensure the job is done to perfection.
FAQs
How long does exposed aggregate last?
With proper maintenance, exposed aggregate surfaces can last up to 30 years or more.
Can exposed aggregate be installed by DIY methods?
Yes, with the right tools and preparation, exposed aggregate can be installed by DIY enthusiasts, though professional installation is recommended for larger projects.
What types of aggregate are best for exposed surfaces?
Common choices include natural pebbles, crushed stones, and polished glass. The choice depends on the desired aesthetic and texture.
Is sealing exposed aggregate necessary?
Yes, sealing is essential to protect the surface from stains, weather damage, and wear.
How do I prevent cracks in exposed aggregate?
To prevent cracks, ensure proper site preparation, correct mixing ratios, and avoid extreme weather conditions during installation.
